There's a great discussion going on in the Flickr thread, and some really cool photos have been submitted. Even right out of the blocks many of you are kicking butt, lighting highly reflective objects with much more control over your highlights.
On a semi-reflective subject, specular highlight size and intensity are defined by the apparent size of the light source.
To control specular highlights on a highly reflective object, you are not lighting the object. Rather you are lighting the area that the object is reflecting back at you. And the portion of your subject that does not reflect can be lit on an entirely different plane, yielding yet more lighting control.
All of the position and apparent size rules apply to each plane. Which either will make your head explode make you realize that you have even more control than you have when lighting a subject on just one plane. Of course, if your subject is not adjacent to the background, you can have yet another plane of light to work with.
Let's look at a couple of your shots as examples.
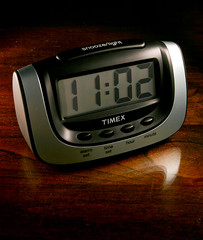 First off, this clock photo shows what James Rubio picked up from Ming Thein's watch photos, and his set-up shots. (Thanks again, Ming.)
Again, you are shooting reflections of light sources. So whatever you design into those sources is going to define the tonality and shape of your specular highlights. James is using partially backlit typing paper as his light sources.
Simple? Yep. Cheap? Uh-huh. But very effective for shooting small objects.
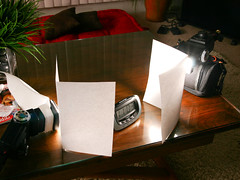 Here's the setup. You can see here that the key is the edges of the lit area on the pieces of paper. That smooth fall-off defines the edges of his clock highlights.
For small scale stuff, you can get away with using typing paper way more often than you'd think. And the relative inefficiency of the paper (at transmitting light) is no problem, because we know that light is far more powerful when it is close.
 This progression of a photo of a disc drive reveals a very clean approach, by Ron Nabity. He is lighting the subject on two planes. In the first photo, he's only using one light, through a small umbrella and lighting from the left.
This lights the scene (including the background) and creates a baseline for the true tonality of the subject, absent the large specular highlights that will define its texture.
 Needing a large clean light source, he aims a strobe at the ceiling and uses that as his reflection in the drive platter and other reflective areas. Note that the spindle in the center is already reflecting the left-hand light source, revealing more of the shape of the complex subject.
Mind you, this is happening on completely different planes. So he has complete control over the relative levels of the specular highlight by adjusting the light level on the ceiling.
This looks very nice, actually. Granted, he could have improved the photo by spray painting "Strobist.com," in reverse on his ceiling, of course. Or he could have reflected a product logo, for instance. They point is that you can play with that other lighting plane.
 Which is exactly what he did here. Note that the addition of a color gel on the ceiling strobe does not alter the areas of the photo that are not reflecting the ceiling light source. Again, it is because you are lighting on two totally different planes.
Specular highlights are a playground for photographers who know how to control them. (Ron talks about the process behind his photos here, in the discussion thread.)
I recommend reading through the discussion thread of you haven't already. There are lots of people asking (and answering) questions. If you have bouncing around in your mind, they have probably been hit already in the thread. If not, ask away.
Or you can just browse all of the exercise photos submitted by the site's readers.
And be sure to check back in tomorrow, when we will get our first full assignment.
NEXT: Assignment: Cooking Light


0 comments:
Post a Comment