
Normally when we talk about balancing light on Strobist, it usually means balancing ambient with flash. But getting good photos of holiday lights involves a different kind of light balancing: Continuous ambient with fading ambient.
You don't need a high-end camera for great results. You can use a very inexpensive digital camera and do just fine. You don't even need flash. It all comes down to what time of the day you shoot. And a couple of other little tricks.
Timing and Balance
 Photo by Troy McCullough
The problem with the vast majority of Christmas lights photos is that most people wait until way too late to start shooting. After it gets completely dark, you can either have the lights or the surroundings properly exposed. But not both.
Conversely, if you were to shoot the lights in the middle of the day, they would not show up at all. The trick is find the sweet spot (actually there is a whole range of sweet spots) where the ambient light and the Christmas lights balance.
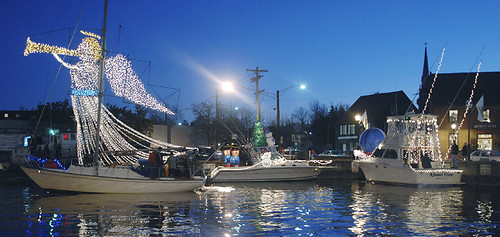 Photo by David Hobby, Baltimore Sun
Understanding this will ensure that your photos are way better than those of your neighbors. After all, isn't that what Christmas lights are really about?
How to Do It:
1. Arrive early. The best time to shoot is before it gets totally dark. More specifically, get there before what looks like mix light to your eyes, too. Arriving around sunset will give you time to plan your shot before the good light happens. You may have to ask your subject to turn the lights on early - most people don't flip them on until the good light is already gone.
2. Compose your photo in such a way as to include as much sky as possible in the background. Shooting from a low position can help. Even better: If you have your choice of shooting direction, shoot into the afterglow of the evening sky.
3. Once you get your picture framed, set your camera's white balance for "tungsten," as if you were shooting indoors without flash. All of those little lights are tungsten balanced. As a bonus, the tungsten setting will turn your afterglow sky royal blue once your light balances out. The sky will look great - even if it is a cloudy evening. And your lights will gleam crystal white -- or whatever color they are supposed to be.
[UPDATE: Since 2006 when this was first written, there has been a steady move from tungsten to the use of LED holiday lights. These days, the best approach is still to start with the tungsten setting -- but check your other white balance settings to see which looks best.]
4. A light foreground (like the snow above) or water (as in the boat photo) can give nice foreground interest. See what you can find. In a pinch a reflective car roof will do. As a bonus, it will steady your camera.
5. Use a tripod or a beanbag to steady your camera. You'll be shooting in the range of a quarter second to a full second at twilight. If shooting with a smartphone or tablet, use both hands to brace it against something solid.
6. Now, wait for the light to happen.
Shoot a test shot every minute or so. At first, you'll be exposing for the sky and the lights will appear unimpressive. Check the back of your camera after each shot to watch the Christmas lights appear to "come up" as the ambient light level goes down. Your eye is constantly adjusting to compensate for the dropping light levels, but the changes will be happening nonetheless. Your camera will record them differently from the way that you eye sees them (you can see a much greater contrast range) so shoot and chimp.
 Photo by Michael DeHaan
Somewhere in between sunset and full dark, the Christmas lights and the ambient light will start to mix beautifully. You'll have about a 10-minute window which will give you a nice series of subtly different lighting variations. Remembering to keep your camera as still as possible, shooting lots of frames through the mix light. Ones and zeros are free, so don't be stingy. You do not have much time. You can delete the duds (or blurred photos) later.

The trick of using tungsten white balance and shooting through the mix works for all kinds of light-filled scenes, not just the typical holiday lights. Church nativity scenes -- even the annual trip to get a Christmas tree -- look great at mix light.
Incidentally, this time of day is when the architectural photographers make the big bucks. And they are smart enough to tell everyone in their subject building to leave the lights on that night, too.
Once the ambient and artificial lights cross balance in intensity your opportunity will fade quickly, along with the evening light. You will know both are gone when your photos start looking like the "bad light" photos you used to take.
Even if all you have is an inexpensive point-and-shoot camera and no tripod, good results are still within your grasp. Patrick Kunzler, a night photo editor with the Chicago area Daily Herald group of community newspapers, offers this great video tutorial with even 2007 point-and-shoot technology:
Finally...
Afterwards, take a moment and put your camera away. You still have a few minutes to enjoy the scene with your eyes. The human eye has the remarkable ability to compress a large dynamic range into a scene your brain can process. Just relax, soak it in and think about all of the shopping you have left to do.
This is one of the few times that both shooting pictures and enjoying the moment do not conflict with each other.
Next: Hit for Average


0 comments:
Post a Comment