 What do you do when you have a coupla minutes to make a quick portrait -- and the bright part of your frame calls for a shutter speed of a half-second?
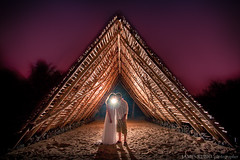
You throw your one light into the back of the frame is what you do. At least that's what Hilo, Hawaii-based photographer James Rubio did in this cool wedding portrait.
Hit the jump for a quick walk-thru -- plus some tips for shooting with flash in this kind of (un)available light.
__________
Work Fast
He didn't have a whole lot of time to think about it, either.
"All these shots were done within 4 minutes from idea to completion since the Bride/Groom had to get to the reception," Rubio said. "It was very rushed and the shot almost did not happen."
That triangle structure would be pretty hard to resist as a backdrop. I probably would have gone for it, too. But the light was pretty much nonexistent, and James' series of photos shows exactly how he worked through the problem within just a few minutes.
 The first try was to use a flashlight as a main light. There's not a lot of sky there, but the flashlight is not very powerful either. So they are easy to balance. Problem is, you have two continuous light sources. How do you balance that?
Remember, for (roughly) each third you add or subtract in distance, you change the brightness of the flashlight by a stop. That is to say, if your flashlight is 15 feet away and you need an extra stop out of it to balance, walk it forward to a distance of about 10 feet. If it is too bright, you'd walk it away to a distance of 22 (or so) feet to bleed that stop of light.
Yeah, I know it does not work out to exactly the 1.414-square-root-of-two formula that the pocket protector types would prefer, but a third is very easy both to remember and to calculate.
I digress.
So, while James could balance that flashlight and sky (and turn the sky a beautiful blue by balancing for the tungsten flashlight) he lost the beauty of the structure as a backdrop.
Okay, show of hands -- how may times has this happened to you:
You spend so much energy sweating the technicals, that you just keep working something like that flashlight shot and make a mediocre shot a little better as your grand reward.
Then, when you get home something really cool like the backlight idea hits you retroactively.
"D'Oh! Sonofa.."
Right off the bat, when you get a boatload of dark thrown at you, think backlight first. You can always add light to the front with a second strobe if you have it. But the first strobe will usually do a lot more for you in the depth and contrast department. And that department is in the back of the store.
Thinking on His Feet
 Better idea: Stick that bare, wide-beamed flash way back in there and use it to light the couple and the structure.
 Seriously, if I am using one flash, as often as not I'll throw it in as a back light.
James did exactly what I would have done while positioning the light -- one quick grab shot at his expected working aperture to gauge the intensity from the position of the light. No need to even focus -- this is just to see where the light will reach and what the exposure will look like. If it is way off, easy to adjust the light at this point.
 So, by the time he gets back to his shooting position, the flash exposure is already close enough for horse shoes and hand grenades.
At that point, the only thing to work out is the shutter speed to get some sky. Remember, the ambient sky is going to be brighter (er, less dark) than the area under the shelter. So when you add light to under the shelter you have a nice light/dark tension to balance against.
James stopped stretching at half a sec, but I would have had no problem going further. Remember, you got almost no ambient under that teepee thing, so the flash is gonna freeze your subject even at a long shutter speed. If you accidentally juke the camera a little during a sec (or two) exposure, the worst that can happen is that your stick-hut vs. sky outline might get a little sqwooshy. That could look pretty cool, actually.
If your flash is doing the freezing, always keep going on that shutter to see what it'll do for you. (I'm very comfy going way into the Hail Mary range, myself.)
Where is the Fill Coming From?
The sand, for one thing. Not only does it wrap some nice, soft "uplight," but it warms it up, too. Ditto the structure itself -- you can see what the light reflecting of of the wood is doing on the edges of both subjects. Nice.
One thing I might do is to let the area directly behind them around the flash stay dark in post. It'll still hold because of the rim light, and you will lose the noise that is starting to happen back there.
But I Never Get Purple Skies...
You probably don't hang out in 1/2-second light at near dark, then. You can get some pretty funky colors in deep twilight. But if you don't, the best advice I can give for a "sunset in a bottle" is to shoot on the FL white balance.
This adds 30CC's of magenta into the mix, which will amp any sunset -- even a nonexistent one. Just remember to green the flash with an FL gel, and maybe an added 1/4 CTO for warmth.
Where to Aim the Flash?
Personal choice. James chose to let the light wrap through a little, giving those nice burst rays. But you could also rim light them from directly behind.
If you are gonna rim light them, I'd put it behind the bride. Why? Because the groom is basically an accessory on the wedding importance scale. (Seriously, who are we kidding here, guys...)
But if you want to make sure that flash is right behind her, one easy tip is to rotate the flash head 180 degrees and use the ready light to tell you for sure that you are hiding the flash behind the subject.
For the Marriage-Minded in Hawaii...
If you are thinking of getting hitched in the islands, check out James' portfolio. He's got some great stuff there -- and he is not afraid of the dark, either.


0 comments:
Post a Comment