Advice: If you are a decent photographer and are selling your house, most definitely help it to stand out from the competition by spending a day shooting photos of it for your real estate ad. And consider creating a website of your own to really show it off.]
__________
 I have been playing architectural photographer this week for a new blog I am working on.
This blog will have one post, and is designed to do one thing -- help us sell our house in a down market.
I have a separate post about the mechanics putting together a blog/brochure. It is mostly designed for general consumption, as I think the idea has worked out really well and might get a little play as a house-selling strategy.
But this lighting post details the problem solving on some of the photos I shot, because any readers heading to the other post for the general real estate / recession stuff probably would not understand our interest in the lighting end of it.
(Heathens...)
Architectural Digest on the cheap, after the jump.
__________
Some General Stuff
Some of the techniques were the same throughout the shoot, which happened over Monday and Tuesday of this week. I had shot some available light stuff earlier, when the daffodils were more in bloom. But most of the lighting pix were done over a couple of days, along with the gazillion other things you have to do to sell your house.
No umbrellas of softboxes were used. Not that I was trying to avoid them. But a Flickr commenter pointed it out after the fact, and I found it interesting. That was mostly a function of lack of space. I was hiding flashes everywhere, and bare lights are smaller. Ceilings (and sometimes walls and doors) were my bounce cards.
No tripods were involved either, which is a little unusual for architectural stuff.
Why?
Everything was done with two-to-six SB-800's, a D3 and a Nikon small-chip 12-24. That's not a typo, either -- that 12-24 is my FX format wide zoom. It covers full FX frame down to 19mm. I would get an FX-format 14-24, but I simply cannot be trusted with a lens that wide.
Strobe triggering was done optically. That is to say that each shot started with some kind of on-camera flash for fill, which triggered all off-camera SB-800's in SU-4 mode.
__________
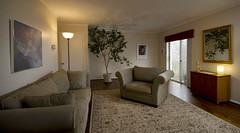
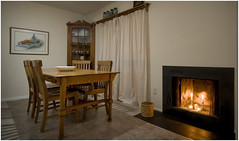
Let's start in the living room, shall we?
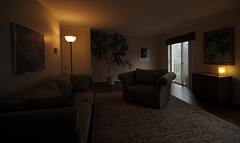 This picture (final seen up top) is built on the ambient coming through the doors at back right, and the lamps in the room. The ambient exposure is a compromise to pull all three of those continuous light sources in as best as possible. This is a late shot with no flash, and I think I may have opened the ambient up half a stop or so from this level. But you can get the idea.
There are four flashes -- two fill and two accent. I lit the room up to about one stop down with two flashes aimed at the ceiling -- one on camera and one out of frame at camera right.
One accent flash (also camera right) brought the couch and painting up to full exposure from a hard angle. It was a snooted, bare flash. The other accent is hiding behind the tree on the ground playing a little subtle pattern on the ceilings.
Why? No logical reason. Just to do it for a little interest. Kinda like no-underwear Wednesdays.
Exposures? Flash power? Aperture? Couldn't tell you.
I built the ambient highlights exposure as stated, and filled with the bounce flashes for a good baseline exposure. Then I accent-lit to taste. (If that's a little bit Greek to you, you can read more here.)
__________
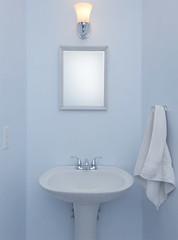 Almost forgot about the powder room, as I shot it last month. This is lit, but with on-camera flash. This room is only 3x6 feet, so bounce off of the ceiling is a default choice. The trick is going into vampire mode for the mirror.
 The solution is to shoot with a very wide lens, vertical, from a very low position. Keep the camera vertical to keep the lines straight. Use the top part of the frame and you just got yourself a poor-man's shift camera -- no reflection.
The other reflection to watch out for is that of your back wall being nuked by the flash. So I angled the flash a little forward to paint a more pleasing reflection of the back wall in the mirror. (Even still, I smoothed it with a little Gaussian blur.)
Exposure is straightforward, but delicate. Exposure at a reasonable aperture with manual (bounce) flash, then dial in the shutter speed until you get exactly the amount of glow you want from the continuous lights. The walls and floor of such a small room act as fill cards, so the shadows magically fill themselves. You actually have very little choice in the matter.
I left the towel a little rumpled just to not be too anal.
__________
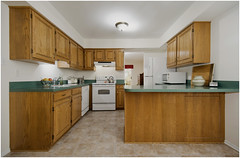 The kitchen had me scratching my head for a few days as I wondered how to light it. I wanted to show the whole room, which had no windows -- and lots of very warm CFLs as light sources.
 At first, I did not know where I could hide a flash. And in the end, I wound up hiding five speedlights in the frame -- plus one on-camera aimed at the right wall, to trigger the others and fill the front. The room is entirely lit by hidden speedlights, with the only ambient coming through the back door in the living room at rear.
How do I light thee? Let me count the ways.
1. Main fill / trigger light on camera, as mentioned above.
2. Main light in the room: An SB-800 hidden in the overhead fixture. Nifty, huh?
3. Not so nifty: The flash was wedged in off-center with a diffuser dome, so it threw a cockeyed light pattern onto the ceiling. I disguised this somewhat with another SB low and behind the counter. It was snooted and aimed up at the fixture to splash a more even circle of light around it.
4. My over-sink fluorescent lamp was swapped out for an SB which was duct taped to the near cabinet wall. (We had already packed the gaffer's tape.) A sheet of white paper on the underside of the bottom of the cabinet gave a soft bounce surface. This also lit the fruit bowl nicely.
5. Same thing, over the stove, but no paper needed -- the range hood interior was already white.
6. Last but not least, a flash was stuck in the living room and aimed at the ceiling to bring the whole room up. Sliding door daylight was the basis for the ambient exposure.
__________
 Here is where I shot the kitchen from. I made this photo later in the evening (we needed the full dark) with two SB-800s and some road flares that we painted white.
Kidding. The fireplace was lit with a few small candles. We shot in the dark with long exposures and the candles really glowed the place up when we opened up that shutter -- even lit the kindling box nicely.
But now the room has to be lit believably. Again, one SB in the overhead fixture (I later cropped that out, but still a perfectly natural spot for a key light. Problem now is contrast. So I fixed that with a fill strobe bouncing into the kitchen at camera left, which smoothed it all out.
Fill was set a coupla stops down. You can see the ratio on the floor at bottom left. Highlights are key-lit, shadows are fill lit. This is the area that shows you how much fill to dial in. Make it look like your eye sees the room normally. No ratios -- salt to taste.
The room was left just a little dark overall, to let the fireplace sing a little bit. We pretty much bought the house the moment we rounded the corner and saw that kitchen fireplace 17 years ago.
__________
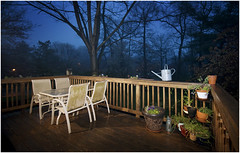 As it starts to get dark on (a rainy) Monday night, Susan asks if I remembered to shoot her garden in the back. Of course I did not remember to shoot it, because I am a total moron during allergy season. So I stepped out onto the deck and saw this mix of tungsten light and deep, foggy twilight.
Okay, technically I only saw the foggy evening and imagined the tungsten light, but I knew I could make it if I worked fast in the last few minutes of light. Before I even go back to get a strobe, I metered an ambient shot and dropped the exposure about two stops down. The color was real -- no tungsten white balance needed.
Working very quickly, I grabbed an SB on a stand with a dome diffuser and stuck a 1/2 CTO on it. (I wanted tungsten the way my eye sees tungsten.) Where to put the light? Heck, I am batting pretty good aping our normal fixtures, so I went to the well again. I put it on a stand right next to our deck light, which is on the house edge of the deck, in the middle.
I powered my warmed-up flash to balance the ambient with a couple of test shots and it looked great -- except the shadows were too contrasty. That's easy enough to fix, quick and dirty, with a two-stop-down on-camera flash. It looks great when you are using it to erase contrast with off-axis light. (More on that here.)
If you look at the deck shot bigger, it looks very crisp and 3-D, but legible everywhere. I was rushing fast (gotta get the garden with the last bit of light) but with a little time I would have prolly dropped the fill ratio a bit. Just a matter of taste, tho.
__________
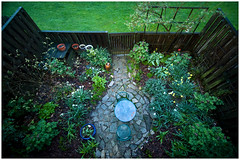 The waning foggy light made the garden look lush, if a little flat. And the garden was way darker then the grass in back. So with the last bit of twilight I grabbed an ambient (somewhere in the 1/4 - 1/2 second range) and exposed for the grass.
A little on-camera fill with the flash zoomed way tighter than the lens gave me a nice center-vignette, and I underexposed that a stop or so. Then I grabbed my stand flash and pulled the dome and gel off for some off-axis light. It came from the far corner of the deck at camera left and was aimed just past the center to feather the key a little.
The ratios are very tight, but even so the two lights bring the garden up to the level of the grass in a very sharp, 3-D way. Bare light sources do that very well, but you do have to keep your fill levels in mind. (Here for bigger.)
__________
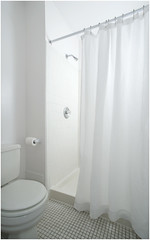 Among the fifteen shots I did for the house brochure, this detail of the
 Bathrooms are just big softboxes -- and you work inside the box. The key light is an SB on a stand in the shower behind the curtain. Aim it at the back right wall and you have a nice, soft source. But even in an all-white room, the fact that the key is behind the curtain means the shadows will be too deep.
An Orbis made quick work of that. Just dial up the fill light in manual mode to taste -- chimp and go. That way, you can keep the whites white, and have just as much contrast range as you want. The ring light fill adds no directional light signature, either.
__________
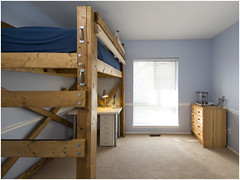 The last one I am going to mention was a little bit of a challenge to work through. Ben's room is only about 10' x 11', and the loft bed soaks up a lot of that.
Note the two-toned rails on the right side. We had to augment this design after he fell out of bed during the middle of the night. (That'll wake everyone in the house up quickly...) We still have not stained and poly'd the extra rails yet, but he is pretty much in jail up there.
Problem is, there is just no place to hide a flash in here, and my goal is a lit/natural balance. So this one was a little bit of a head-scratcher, too.
The exposure was based on the light streaming in through the window, or more accurately, what that light was doing in the back of the room. No leaves on the tree yet, so the view is not worth saving. Thus, I could let the window blow out a little and also grab some under-bed ambient from the desk lamp.
Now, to build the rest of the frame with flash, but only up to a ratio that looks like normal room light the way your eye sees it. Fill on the far left was from a stand-mounted flash, up high tucked into the corner of the small room. The wall was blue, so we had to correct the bounce color by taping up a shoot of newspaper to get it neutral.
If you ever need to fix the color of the splash your flash makes on the wall, newspapers are a pretty easy fix. For a few more years, anyway.
The other side fill was easier, once I realized that the open closet door out of frame at camera right made a great big reflective light panel when you shot a flash into it. The trick was not overdoing either of the fill lights.
This picture is an rarity in the Hobby household, as we have not actually seen Ben's carpet in several years. It is usually covered in about two feet of Legos, most recently Technics and Mindstorms. He builds these weird robots and vehicles and is teaching himself the programming.
He is even trying to blog a little bit (all by himself, as you can see) but I think we need to work on the "actually developing content" part. To be fair, I must say that his site is better than my blog was at 8-yrs-old.
I digress.
That's it for the lighting stuff. I am working on a more general-audience post on the "buy my house" pseudo-blog idea, which will go up shortly. One more thing, which I will not be mentioning in that post:
If anyone within the sound of this post actually ends up buying the joint, you'd better believe there will be a full Starving Student light kit (with an SB-26) a boxed set of Lighting DVDs and a case of cold, delicious Diet Mountain Dew left behind when we move out.
Just reveal your secret decoder ring flash status after we agree on a price.


0 comments:
Post a Comment