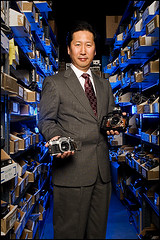
 Reader Keith Taylor photographed the owner of a very large camera repair facility for the Business Outlook issue of Gwinnett Magazine. It's a clean, two-light setup that has a lot going for it.
 Take a moment to reverse engineer it (it's an easy one) to exercise your lighting muscles.
Then, for a closer look at what works in the lighting -- and a couple ideas on how to tweak it -- hit the jump.
___________
First off, you may remember Keith from his fireman shoot, which was profiled here earlier. Back then, he was using Vivitar 283's. But he has since moved up to AlienBees 400's.
Since Keith is comfy using his speedlights in manual mode, moving to the big flashes is a piece of cake. Everything you learn with a manual speedlight easily translates to the more powerful flashes.
This shot is lit in a similar manner as his fireman shot, except that the front light is coming from pretty much directly over the camera rather than off to camera left. Said front light is a small Westcott softbox. We know it is directly above camera from the way the nose shadow falls. Easy tell.
The backlight comes in at a lowish angle, hard and blue. It's obviously behind the guy, but we also know it is low from the fact that it is lighting the bottoms of the middle-row boxes.
Think for a sec what this establishes for the boxes, lighting-wise. They are pretty close to being exactly cross-lit: High front vs low back.
Also, they are cross-lit with different colors of light. This makes for a very 3-d effect on the boxes and really maps out the texture of the environment in an interesting way.
He went for broke on the blue gel intensity, which is a totally subjective choice. (Think Spinal Tap, at #11 on the voume scale.) One reason I like the blue family of gels is that they include the CTB, or "color temperature blue" group. They correspond to the opposite, CTO (color temperature orange) gels, which turn daylight into tungsten. Which means that you can get both of them in full strength, half, 1/4, 1/8, etc.
You can get a controllable tonal contrast by, say, lighting your subject from the front with a 1/4 CTO and the background with a 1/4 CTB gel, and the warm-vs-cool thing offsets in a neat way. Plus, you can make it subtle, bang them over the head with color, or anything in between.
Keith has the front-back contrast thing working for him. He also has nice internal tonal separation everywhere except for one place: The guy's head.
His head has a little hint of blue going up the left side. But Keith had better cross his fingers and toes if he wants Camera Guy's dark hair to separate from that dark background in the final product.
There are a couple of ways to go after this. The easiest would be to simply raise the backlight some and nuke Mr. Camera Guy to give him an unearthly blue ring around his head. That'd separate that black-on-black tone, fer sure. But it would also look a little weird.
Remembering Keith has a Vivitar 283 kicking around somewhere in his kit, my preference would be to take care of the black-on-black problem by raising that far background tone up a little. Wouldn't take much, either. You could bring it up to two stops below medium grey and it would separate nicely from Camera Guy's dark hair. If you gelled it to the same color as backlight number one, you'd create a full blue area in the center top that would make the first blue backlight look more natural.
You could stick the 283 right behind the backlight, pointing towards the back of the room. Or, depending on the room itself, you could stick it somewhere low in the back of the room and just wash some blue light up on the wall to make his hair separate from the blackness.
But I'm cheating now, right? Just pulling an assumed third flash out of Keith's bag, as if we all had endless light sources to work with.
There is a way he could use his backlight to do everything: Lose the reflector and point the bare bulb straight up.
Downside is, he'll have to make a little blue gel condom for the AB400 flash tube. But once he gets it gelled, that thing sends blue light out in all directions. Then, all you have to do is gobo it where you do not want light.
I would probably gobo it on the sides, and maybe a little on the top as well. I really like what the directional backlight is doing (at least, in the areas where it is happening.) Gobo'ing the top and sides would accomplish a lot. It would keep the directional light coming from the back. It would keep the blue from getting too hot on the sides close to the light. And it would send some blue light towards that back area to separate the guy's head.
See the online version of the Gwinnett Magazine Business Outlook story here, and more of Keith's editorial portraits here:
Created with Admarket's flickrSLiDR.
___________
One difference in the way good lighting photographers think (as compared to the rest of us) is that they think of light as a means of solving a problem. Other shooters just think of light as a way to create a look. And that look can sometimes grow into a starring role in the photo.
I know this because I am as guilty in this department as the next guy. More than most, to be honest.
But the hotshots tend to think of light as a tool -- one of many -- in the final photo. And to them, light is simply a means to an end rather than an end-all.
After you create your light -- but before you start making your final frames -- take a moment to anticipate the problems you'll see later which can be solved with a little tweak. It'll pay off big in your final photos.
And most important, once the light is nailed down, focus all of your attention on photo/subject interaction. This way you'll stand a good chance at grabbing some (well-illuminated) moments. When the light is good and the photog and subject are clicking together, that's a high-odds recipe for success.
___________
Related links:
:: Readers Shoot Back: Keith Taylor ::
:: Pimp My Light: Underwater Flash ::
:: Pimp My Light: Light-Painted Knife Knife ::


0 comments:
Post a Comment