 Want to give your little munchkin the supermodel ring flash lighting treatment, but all you have is a dSLR with a pop-up flash? Or even a point-and-shoot?
 All it takes is just a few dollars and some ingenuity to kick your flash photography up a notch.
 Reader Doug R.'s "coffee can" adaptation of the HD Ring Flash can be tweaked to fit to almost any pop-up or point-and-shoot camera.
 First, how he did it, then how to tweak and adpat it.
_________________________________
Canned Beauty Light
Last month when I designed the HD Ring Flash adapter, I knew it would not be long before people started tweaking the concept and improving it. What I did not anticipate would be that someone would shrink it down and make it friendly to even the pocket digital cameras.
Doug has done just that, losing the 16" concrete form housing in favor of a coffee can. This makes it all but palm-sized, and the shiny metal interior handles a lot of the (required) light reflecting for you.
 Doug starts with an old potato-masher-style flash bracket. But you can substitute a piece of aluminum strip (1"x3'x1/8") at a hardware store. I know Home Depot carries the stuff. It cuts, bends and drills easily with normal household tools, too.
 So if you have a camera bracket, like Doug did, feel free to use it, But there are alternatives.
 Like the larger version, Doug's design is a tube-within-a-tube. The outer tube is the coffee can, and the inner tube is a subwoofer port. (Doug clearly has some neat detritus around the house.) But this, too, can easily be aped with a short section of PVC.
 To reproduce the flange on the end (which is very helpful to hold the diffuser) you could run a multi-layered, thin strip of gaffer's or duct tape around one end to build it up. If you use white PVC, best to paint (or gaffer tape) it black on the inside to avoid flare-inducing reflections. You can get the stuff in black plastic pipe, so that might be best.
Just get it in a big enough diameter for your camera's lens, but not any bigger than necessary. You'll need a fairly close fit to allow your flash to fire on the outside of the lens-hole tube. You'll also want the tube to be pretty short if you want to use wider lenses. But the shorter the tube, the less bouncing around room the light has in the contraption. So the wider the lens you design the can for, the less even the light will be around the ring. Life is a trade-off.
Wrap the outside of the inner tube in foil (matte side out to better disperse light) then in clear packing tape. You'll need this tube to be pretty reflective on the outside for the light to efficiently bounce around inside the can.
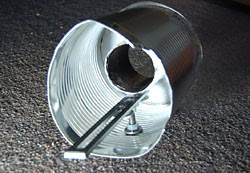
Doug uses his bracket thingie to support the whole setup. The bracket is bolted to the inner tube with a bolt and a few nuts and washers to act as a stand-off. At the other end, the bolt is fastened to the coffee can in a similar manner.
 You can see the other end of the bolt here, from the outside.
The front diffuser should be made out of material that disperses the light pretty well and is of neutral color. Doug's is made from the lid of a large ice-cream container. Find something without wording, obviously.
Doug cut a donut shape out of the diffusion material, and made a friction fit with the inside tube. If you are using PVC, you'd probably want to slide the donut-shaped diffuser down to your DIY tape flange (see above) and then make another flange behind the diffuser to sandwich it in firmly. If you click on the pic above, you can see that Doug simply used packing tape to connect the diffuser to the can at the edges.
You'll need to position your bracket or aluminum strip correctly, and drill a hole if there is none present to act as a support for the camera. The stuff is pretty easy to bend, if you have to, for camera positioning. Make sure you take into account the position of the tripod hole on your camera, as some are off-center.
A standard 1/4x20 bolt and a wing nut can be used to secure your camera to the strip of metal, if you are not using a pre-made bracket.
 Here's Doug, popping off a shot to show off the business end of the can. This is a really sweet design. Best yet, I think it is so cool that anyone with a with a point-and-shoot and a free afternoon can now play with ring flash.
________________________________
Tweaking, Adapting, Improving
Doug's design allowed for a dSLR with a pop-up flash, but this could easily be adapted to fit a point-and-shoot.
You'd be using a smaller diameter inner tube (P-n-S lenses are smaller) and you would want to make sure that your flash is positioned on the outside of the lens tube. As some flashes are very close to the lens axis on different models of point-and-shoot cameras, you'll have to give careful choice to your inner tube's diameter.
Here's a tip for getting better diffusion (and more even light) on your coffee can ring flash: Tape a little foil deflector piece on the outside of the inner tube, directly in front of where the flash will line up. Angle it so the flash's light bounces up to the interior wall of the can.
This will block the direct light from making a hot spot (and uneven light) on the diffuser panel in front. This will cost you a little bit of light output, but you'll get more even light on the front panel.
In any case, you will not get a ton of range out of this design. But it should work great for indoor head-and-shoulders shots, of even 3/4 length portraits.
Thanks to Doug for picking up the HD Ring Flash design and running with it. (And seriously, could Olivia be any cuter as a model?)
________________________________
Related Links:
:: Pop-Up Ring Flash Discussion ::
:: More P.U.R.F. Photos! ::
More on Ring Flashes:
:: Ring Flash Week ::


0 comments:
Post a Comment