 The umbrella-reflecting-off-a-wall lighting scheme is a technique that I demonstrated in Rhode Island and in London. But we have only hit it briefly on the blog, and there have been several questions about it. So today we'll go into a little more detail -- with some lighting diagrams -- to better explain it.
(UPDATE: You can see a setup shot of the photo above here. Thanks, Rui.)
It's an easy, elegant solution when you have a single light source and a darkish background with at least a semi-reflective surface. But the angles involved are a little hard to grasp if you are not seeing it done in front of you. It is one of those times that talking about it is not nearly as effective as a demonstration. Or at least a diagram or two.
The premise is simple: You are lighting a subject against a dark-but-reflective background. The umbrella lights the subject as usual. But also shows up in the background as a specular highlight.
 The ability to vary the location of the reflection with respect to your main subject allows you to use the reflection to halo the subject, and/or to separate the shadow side of the subject. The latter is especially important when using just one light source.
This is basically a billiards shot, but you're working with light instead of balls. You want to be in a position to see the light source as it reflects from the background and place the reflection behind your subject exactly. This angle of attack has to be correct on both the vertical and horizontal axes.
Let's hit the horizontal axis first, using a "top view" diagram of the setup. It should make sense enough that solving for the vertical axis should happen before you even see the next diagram.
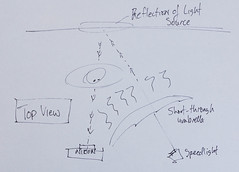 Here we are from the top. Actually, in looking at this diagram, the camera may even need to be a tad more to the left to catch the reflection. Or if you can imagine the wall rotated a little bit counter clockwise, that would also help.
The idea is that you line up your shot so that your light reflection is on axis (and thus, visible) and the subject is lit off-axis (basically with a light that is off camera, and thus, off of the camera's axis.)
You could put the light right behind you (although you would partially hide it) and accomplish the same thing. But the light would be flatter on the subject.
But this technique might make a lot of sense if you were shooting someone very dark-skinned and wanted to use the reflections to increase the tonal value. If that particular subject wore glasses they would throw the light back at you in a bad way, though.
With glasses, you would want to light your subject off-axis and turn the subject away from the light. There is an example (without the background reflection) here. (In our second example above, the light was high enough that it did not reflect.)
From a horizontal axis, this should be starting to make sense. But you also have to hit it on the vertical axis, too.
Let's go back to our "straight-on" light as an example. Big umbrella behind you. You are lighting the subject from straight on and catching the wall reflection just fine. But you would probably want to light your subject from a little higher than the camera axis, right? So, to catch the background reflection, you will have to shoot the subject from a little bit of a lower angle, to catch the reflection of the light that is coming from the higher angle.
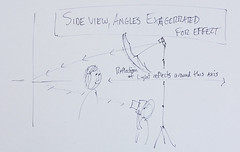 See what I mean? (And, as always, click on the pic for a bigger view. Click "all sizes" on the Flickr page for even bigger versions.)
In most cases, you'll be combining these two angles. For example, you may be shooting with your light up a little high and to camera right. So you would want your camera position to be a little low and to the left side of your subject.
Do not stray too far off of that center line, though, as the process of reflecting your lighting angles basically doubles them. A little does a lot. You'll be right there brushing up against your umbrella.
Now, what to do with that reflection? Where to put it?
I like to move it to the side of the subject opposite the light source. This will give you wonderful internal contrast that'll reproduce just about anywhere. Modeling lights would be helpful here, but you do not really need them. Just look through your camera and pop the flash with a trigger button. You'll see exactly where the reflection is.
If you are hardwiring the synch, shoot and chimp the back of the camera and adjust your position. It is easy when you get the hang of it.
As for the potential backgrounds themselves, dark wood is awesome. As are those temporary room dividers (that is what we used in London.) Or any wall painted a dark color with a satin or semigloss paint. Or a dark wood door.
Look around and you'll find lots of ready-made backdrops. Keep them in mind for when you next need them.
And you can make one, too. A sheet of drywall is pretty cheap ($12 or so) as is a quart of paint. That gives you tons of choices as to exactly what you want to do with a backdrop.
You could even order a, say, 5-foot x 5-foot sheet of cheap countertop laminate to cart around for a series of themed portraits. Be frugal, but be creative.
And stretch that one, soft cheap light source so that it gives you double duty.


0 comments:
Post a Comment