 Results from two weeks ago, in which you were asked to shoot a portrait using an umbrella to both light your subject and create a specular highlight on the background, as in this example.
From the final edits, it is clear that this was a bit of a polarizing experience. You either got it or you didn't. It was either a natural extension of the experiments in the kitchen, or it was a maddening exercise in geometric futility.
The trick: Stay close to the umbrella and don't push that angle too much because everything is doubled. Also, maybe find your specular reflection first and then just stick your person in front of it. As always, click the pic for more info, or to leave props to the specific photographer.
The takeaway from this technique-based assignment is that one small light can be stretched to create a nuanced, three-dimensional portrait if you keep your eye out for a background with the right tone and surface quality.
Leading off above is a self-portrait by h_oudini, who used his armoire as a reflective surface. He took care of the crack between the two doors by applying a frontal lobotomy crop to himself. This is always a great solution for hiding an imperfection, whether the offending area be in the background or on top of your subject's head.
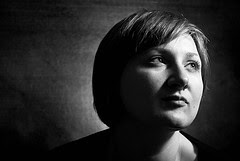
 The surface quality of the background in this shot, courtesy Scott Campbell, is not as reflective as some of the others. This background results in a softer highlight being thrown back at you. It's more subtle and muted.
The expression is this photo is a nice bonus, too.
Since you can choose to include a specular highlight or not in these situations, you now have the ability to get two different tones out of any one dark, reflective background. If you are shooting in a fixed location (like a studio) just think of the range of background colors and tones you could have at your beck and call be keeping a collection of 4x6-foot pieces of cheap countertop laminate laying around. Seriously, this stuff is not that expensive.
 Remember: After you nail the lighting technique, you still have to include some personality in the photo.
 Which is exactly what itsjustanalias did. If you don't believe me, check out this composite from the shoot. If you want to keep a model happily sitting for you, it is hard to go wrong with pie.
 Most of the entries were horizontals. But this technique lends itself well to verticals. And those can be done with a much smaller piece of real estate for the background.
This is a great trick to pull out when you need a potential cover in a pinch. And aigi is a cowboy killer (love those aliases, folks) came in tight and vertical for a more pensive version for his effort.
Once you get that background highlight lined up, move in. Hit some tight crops. Play around with the internal geometry of your shot.
 Finally is this rather ingenious solution, which a few of you figured out. Can't find a good specular highlight background? Maybe you are looking in the wrong dimension.
No, not the Twilight Zone. It's just that maybe you were concentrating too much on vertical surfaces as backdrops. How many of you have a coffee table (or some other kind of table) which would have worked, turned on it's side?
That's what Danny Kino did. Nice thinkin' there, Danny.
Actually, one of the other shots pictured here used that same technique. Can you spot it?
_______________________
So, them's the shots for the specular background portraits. See them all here, and the selects here. Group discussion is here.
As for the ones on this page: Nice, simple elegant, tonally rich photos, all. It's just a neat look, and I hope you feel comfy trotting it out the next time you want to do more with less.
But for now, better rest up, get some exercise and eat your Wheaties before next week. Because that is when we jump back into the lighting controls. Next is light balancing, maybe the most complex -- and most useful -- of all of the lighting controls.
NEXT: Balancing Flash at Twilight


0 comments:
Post a Comment