 This is so cool.
 I would love to take credit for this idea, but the props go to Strobist reader Gut Mann, who posted a note in the Flickr Strobist threads a ways back.
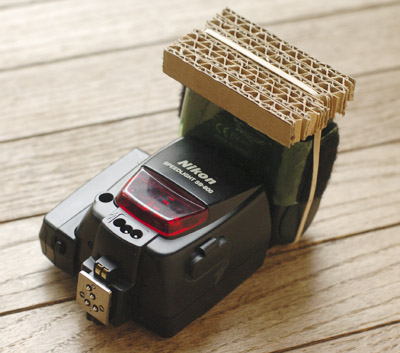
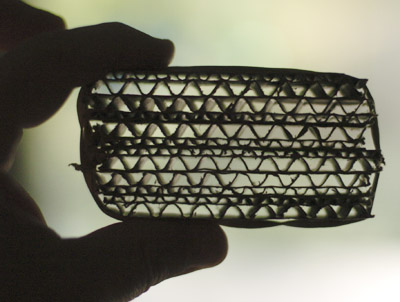
It sat on my list of (about 20,000) things to do until I saw a piece of thick, corrugated cardboard yesterday. Making these little grid spots really could not be easier. (Heck, the top picture pretty much explains it.) And can be done with things you are likely to already have around the house.
I made a few grid spots for my speedlights. Here's what I used:
• Some corrugated cardboard - the thicker the internal cavity the better, and you won't need much. Just keep your eye out for a biggish box designed to hold something heavy. That tends to be the thick stuff.
• A ruler.
• A box cutter or razor knife.
• Some glue
• A rubber band.
First a little theory.
The grids will give you a very tight spot of light - tighter than a snoot - with nice edge gradients.
The beam width is a function of the thickness of the grid vs the size of the internal spaces of the corrugation. I made a half-inch and a one-inch thick grid for each of my flashes, and they work great.
There are two things you should know about these grids.
One, they will eat some light. But that is not an issue, since they are used with direct flash and generally in pretty close quarters.
Two, they will warm the light up somewhat. This is actually a bennie as far as I am concerned, as they tend to get used to light people and the warm light on skin is quite pleasing.
That said, they are, uh, free, which compares favorably to the ridiculously expensive extruded aluminum models.
Time to Make the Grids
The instructions are to make one grid of each size (1/2 inch an one inch) for a speedlight. Adjust to your needs accordingly.
1) Cut a 1/2-inch wide strip of cardboard about 16 inches long. Cut longer if your cardboard is not the thick, corrugated type.
2) Your strip should be cut so when you look at the long side, you look through the little corrugation tunnels. Be careful not to crush the tunnels when you cut. Use a sharp knife, and not on a surface you can damage.
3) Repeat, making a one-inch wide strip in the same fashion.
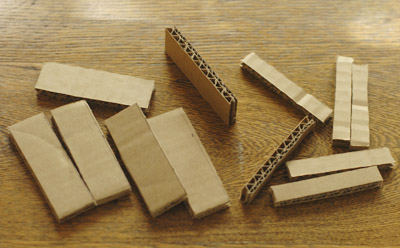
4) Cut the long strips into sections a tad wider than your flash head.
5) Stack them without glue to make sure they are wide enough to cover the flash head when stacked.
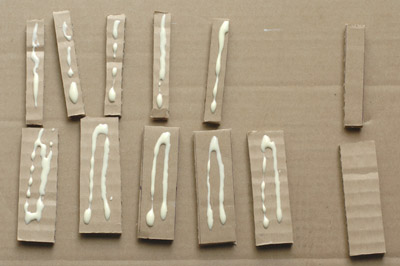
6) Apply glue to them as shown. The last section will not need to have glue applied, as it will be held by the glue on the next-to-last section.
7) Spread the glue with a finger or piece of paper to get complete coverage on one side of each piece. You do not need to use a ton of glue.
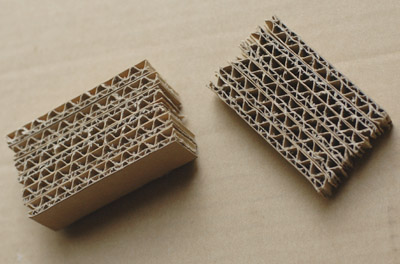
8) Assemble them as shown.
9) While the glue is still wet, align them with a flat surface so they will rest properly on your flash. As long as one side of the stack is straight and even, they will work fine.
10) Let them dry. You can "clamp" them with a rubber band as they dry if you wish. Be careful not to crush the layers.
Attaching And Using Them
You're good to go. Attach to your flash as shown in the top photo. Use a neutral or warm-colored rubber band. You can get fancier with the mount, but this way works fine.
They will give a very tight beam spread. Mine grids approximate about a 300mm lens.
The fall-off is quite smooth, with a nice, hot-spot in the center.
You can put a nice cardboard border on them, like Gut Mann did. But it really isn't necessary to get the job done.
And there is no law saying you need to use cardboard, either. You could use corrugated plastic. But you'll want to use a dark, neutral color (black would be ideal) to keep the light from bleeding out of the edges.
White is going to have a very soft - maybe too soft - gradient at the edges. And a colored version, say red, is going to change the color temperature of the light. The cardboard works in this case because the color shoft is actually beneficial for skin.
I am planning to use these for some assignments soon and will post the results as an On Assignment piece or two. The effect will be similar to that of a snoot, but tighter and with more control. They will also take up less space in your gear bag. Both tools have their own uses, and give slightly different looks.
I wanted to show you what I was playing with so you could try it out for yourself in the interim.
Give it a try. We'll compare results later.
And if you just stumbled onto this place from Makezine or another blog, you see what we are all about here.


0 comments:
Post a Comment