 Once in a great while, I am tempted to pull out the big lights on location.
 By "big lights," I mean my trusty, well-worn White Lightning Ultras. I still have a pair of 600's, and I mainly use them to overpower sunlight when I need to create a "magazine look" on a larger scale.
Last week I had a food shoot which had to be done on location because it required quick access to a freezer. Since we do not have a freezer in The Sun's photo studio, I packed the WL's in the trunk and headed to the home of one of our features section designers.
We were shooting cold, no-cook foods, and she had made some neat "ice bowls" that we were going to use to emphasize the theme.
The bowls melt very quickly, so we would have to work fast. The idea was to pre-block the shot and pull the bowl out of the freezer when we were ready to shoot. We had three shoots to do in a small area (her kitchen) and they each required a completely different setup.
Looking at the shooting area, I quickly decided against the big flashes. I thought they would be big, cumbersome and slower to arrange than my familiar SB's. And then there is the fact that the ice was melting into water everywhere, and those WL's use AC power. That's a potentially bad combo.
In the end, we went with just two Nikon SB-800's. And only one of them was on a stand for each shoot.
The result, while not overly produced, is a good example of making do with two small lights and using some found objects as light modifiers. In the end, it was a very satisfying and teamwork-oriented shoot.
In the three articles that follow, we are going to walk through each of the three shots, thinking out loud as we go. I am going to post the process shots and the solutions we used to get to the desired looks.
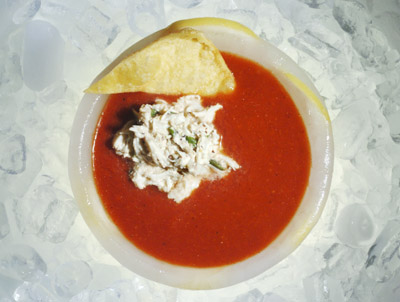
The three foods were to be a gazpacho (cold soup) with crab, a cold bean salad and some tuna tartare.
We wanted to shoot the soup in an ice bowl and using ice as a background. I figured that we would have to backlight the ice, so we would need to get it off of the ground in some sort of a translucent container. What follows in an exercise in building a light box that would give smooth backlight - and making it from found objects in a kitchen.
I had brought some tupperware with me, and Joanna had more of the same. She also had a couple of white cutting boards. I had a variety of plastic baggies (to protect the flash when working near water.)
So we started building a light box.
I wrapped the strobe in plastic, hooked it to a Pocket Wizard, put it on 1/4 power manual and set it in a tupperware bowl. I knew I would have to diffuse the heck out of the light - in several stages - to get even backlight.
 Every time I put a new piece of tupperware over it, I would pop the flash and "eyeball" the hot spot on the plastic.
 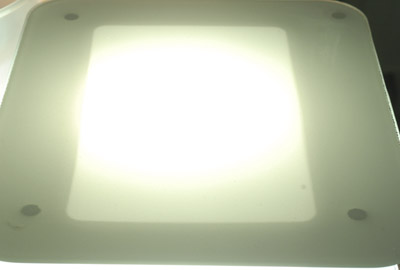 When it looked a little more even, I knew I was close. Adding another layer of tupperware and cutting board got me a smooth light spot that was large enough for my framing area.
 A quick test shot to see how even the illumination looked in the photo...
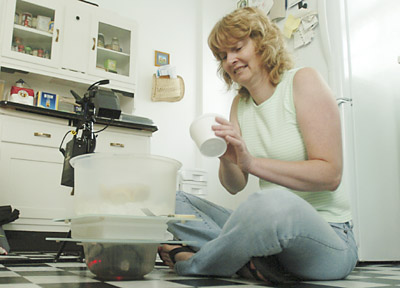 Backing up, here is what it took to get an even light box from a small, bare shoe-mount strobe.
Now, you might think all of that diffusion would also suck up all of my light and rob me of the power that I needed. You'd be both right and wrong. Yes, the tupperware did eat a stop or two of light with each new layer. But remember, that light was not going to be a light source. It was going to tone a background. I would be shooting right into the backlight. So a little goes a long way.
Our tupperware tower now complete, we were now ready to shoot some soup. I had used 1/4 power for the bottom flash to give me some wiggle room either way, should it turn out to be over- or under-powered. As it happened, it was fine.
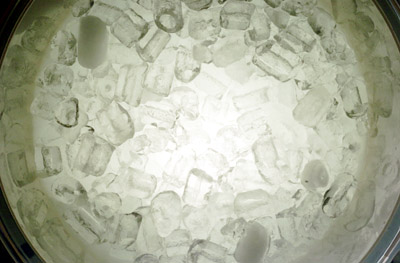 I fired several test frames and adjusted my aperture to give the best backlit effect on the ice.
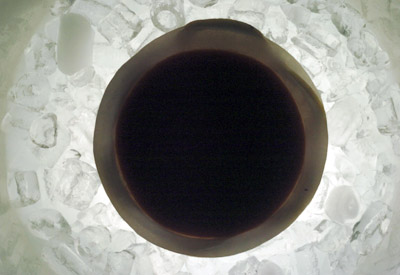 Here you see the first shot with the soup bowl added. The soup is in deep shadow because we are only using the bottom light source. Now, we have a dark canvas from which to start our front lighting.
 I tried using a snoot on the front flash to control the spill, but it was still too wide. So I switched to a homemade grid spot. It worked fine.
(As for the cardboard grid: I'd tell you, but have to kill you. That nifty piece of cheapskate engineering is still in beta testing.)
 With the soup in position I quickly aimed the gridded strobe. Next came a quick series of test shots during which I adjusted the output (on manual) of the front strobe until the soup was the right exposure. No meter, no Polaroids. (No runs, no drips, no errors, as the old Krylon paint ad used to say.)
One down, two to go. No melted bowls, and - so far - no electrocutions.
The point(s) of this shoot, along with the next two parts to this series, is that you do not need thousands of watt-seconds of light for a food shot. Nor do you need expensive light modifying equipment. You can do just fine with some cardboard, tupperware and a little creative thinking.
Next: Tupperware and Trash Bags, Part 2 of 3


0 comments:
Post a Comment