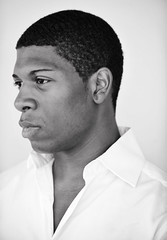
 I did a headshot of opera singer Curtis Bannister recently as part of my project with the local arts council.
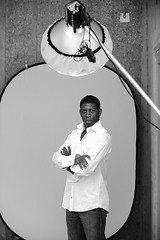
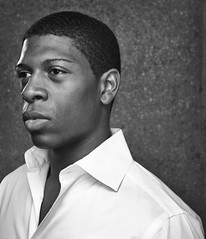
 We worked outside in the shade to make a quick, makeshift studio -- using the ambient as our first light source.
Shade, shade plus flash and my secret weapon for black-and-white conversions, inside.
__________
Shade is Your Friend
I know I am broken record on this, but it bears repeating that shade is your friend.
It does two things for us, as lighting photographers: It creates diffuse light and it knocks the ambient level down to where we can more easily mix it with flash.
But there are different kinds of shade. And my favorite to work with is open shade, or what some people think of as "north light." Honestly, it does not matter what direction the light is coming from. You just want to have your subject in shade and use nearby full sunlit areas to light them indirectly.
In this case, Curtis is standing under an alcove in the middle of the afternoon. An area of open sunlight is directly in front of him. So the ambient light is effectively turned into a huge, on-axis source. It has direction -- and that direction is pushing right into Curtis' face.
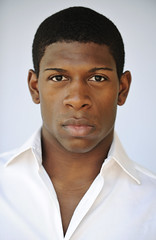 By itself, this makes great light in which to shoot a portrait. Remember the WIRED video on street photography? Same kind of thing.
The light is not completely diffuse. It actually has some direction. Your subject is in shade and his face is seeing a large, sunlit area in front of him. That area becomes the light source.
The two photos above were both shot all ambient, in this configuration. (More on the B&W conversion, below.) The background is a 5x7 foot collapsible white muslin, to erase the context and focus attention on Curtis. But if I pull that background out and rotate the shooting position 90 degrees to camera left, you can see how much direction that "shade" really has.
 And when you start to think about open shade as a light source, and not the light source, you quickly see how versatile shade is as a building block for added light.
Normally, I will start with just the directional shade light. And remember, you can add negative fill to shape this kind of light very effectively. So typically, I'll shoot with only the open shade before adding other sources. When (and if) you are ready to move on, simply change your camera's setting to underexpose the shade. The shade now becomes the fill light.
 When you add a key light, the shade is already acting as your on-axis fill. And it is set exactly where you want it to be.
 Since the fill is continuous light, you can vary its level either with the aperture or the shutter speed. Limitations are that your shutter cannot go above your camera's sync speed, and you cannot use an aperture above that at which your flash can light your subject.
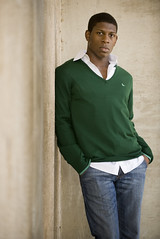
 Here is a setup from right when I added the key light. It's an old WL 600 with a beauty dish and sock passed to me by my friend Cliff Owen. (It only fits the old WLs and not the new AlienBees. So it'll go on to whoever ends up with my White Lightnings when the time comes.)
The beauty dish is a little hot on Curtis' shirt in the setup shot. I ended up feathering it up a little to knock the shirt down. But you get the idea.
It's a one-light setup, but two lights are actually being used. And the amount you drop the ambient defines the contrast range of the photo. Ambient is always the first light, whether you use it or not.
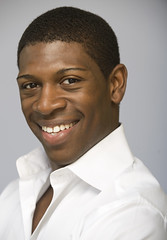
 Moving over a few feet to the left for a more textured wall, we yank the white muslin and go for a lower keyed background. To increase the contrast, we work a little higher above the ambient light level. To get more shape, an SB-800 is added as a kicker from back camera left.
Interestingly, this shoot is in the exact same location -- and time of day -- as in this shoot last summer. Same principles regarding building on shade, too -- but very different looks.
Again, two strobes -- but three light sources. Heckuva lot easier to use the ambient as fill than to employ a huge Octa with a ton of watt-seconds as an on-axis light.
But starting with an open shade studio, it is easy and natural to work a quick progression through a lot of different lighting looks in a short amount of time. Your complete setup becomes the baseline for each new variable you add.
Black and White for Dummies
The B&W conversions above were done with a Photoshop plug-in called Power Retouche Black/White Studio.
If you are an old fart like me, you will love it because it takes you right back to the darkroom. There are two conversion screens -- film and print. The settings and sliders are very familiar to anyone who has ever used B&W film or has worked in a B&W darkroom. It has filters, film stocks, multigrade paper -- the works. Even I can understand it. And it makes much better conversions than I was getting in CS3.
You can download a demo for free if you are interested. It watermarks your conversions, but otherwise has full functionality.
It sells for USD $63, but I noticed they had an affiliate program. So I emailed them and reworked what would have been an affiliate commission into a discount. If you like it and want to buy the plug-in (or their full suite) enter the code 548ABA04 at checkout to get 25% off of either. The code is good until November 11th.
I have been using it for all of my BW conversions, and love it. All I miss now are brown-tipped fingers from the Dektol and old movies in the darkroom on the red-gelled 9" black and white TV we used to use as a safelight.


0 comments:
Post a Comment