 "I love the macro shots and your explanation, but since everyone is going to talk about those, I'll throw out a different question.
The shot through the window is also very successful. Did you do any gelling there, or is that all existing room light?"
"I love the macro shots and your explanation, but since everyone is going to talk about those, I'll throw out a different question.
The shot through the window is also very successful. Did you do any gelling there, or is that all existing room light?"Thank you, Gavin.
And actually that shot is lit entirely by flash. Or rather, flashes -- four, to be exact -- and every one is gelled. Diagram and walk-thru, inside.
__________
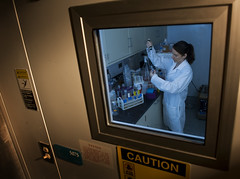 We were shooting each of the scientists and students working with the halophiles in this particular lab at the Center of Marine Biology in Baltimore.
I photographed Valerie working in a "refrigerated incubator," which is not a bad place to be in Baltimore in August.
I wanted to show temperature as a visual element, and the classic way to do that is to use cooled-down color temperature in your lights. This is where the CTB (color temperature blue) gels come in very handy, as not only do they come in relative strengths but are perfectly offset by the corresponding CTO (color temperature orange) gels.
So, to show temperature differential I would "blue" the inside of the fridge. As a contrasting color, and to make the blue stand out, I decided to use a corresponding warming gel on the outside.
This is where one of the Strobist gel packs can come in handy. They give you that set in quarter, half and full strength. Not exactly being a subtle guy, I went with full. But I could have nuanced this as much or as little as I wanted, were I one of yer more sophisticated types.
In addition to the warm vs. cool thing, I also had to shoot through the window without seeing my own reflection. This would be a little tricky as the window was small and I would also be lit by the exterior light.
So, I fired the (CTO'd) outside light from over my right shoulder, and shot diagonally through the window. Both of these served to kill my reflection in the glass. The outside light was also snooted, to put a little gradient in the door as the outside corners fell out of the beam.
Here is the diagram:

Inside, I wanted the whole room to be a contrasting, cool color. So I lit it with two speedlights with full CTB gels. Nothing fancy -- just sat them on the waist-high counter tops next to the near inside wall and bounced them off of the ceiling.
This got the effective light source (now, the ceiling) far enough away to light the room pretty evenly. I lit the room to about one stop down. Then I stuck inside flash #3 on top of the upper cabinet on the left and pointed it down, to add a light to Valerie.
Being as the room is already lit up to only one stop down from this little spot light, it is very subtle. But it does clean her up, light wise.
This light is also CTB'd, which keeps the full color of the interior consistent. But I did do a quick little cheat in post, lassoing Valerie's face and hands and warming them up a tad. Not all the way back to normal, but enough to sell the cold blue without Valerie looking too cadaverous.
We built the light front to back, one layer at a time. I shot at a 250th, to nuke the interior fluorescent lighting, and built the outside light up to a decent aperture. F/8 or /11 or something like that. Then my exposure was set and I just brought the interior lights up to match. No flash meter, no hard numbers. Just work fast and add salt to taste.
It took us about ten mins to set up and another three or four to shoot. The only stand involved was the one outside the door with the warmed up light. The rest of the flashes just balanced on stuff.
Quick and easy, really.


0 comments:
Post a Comment