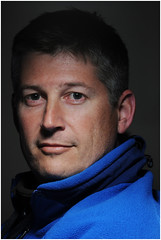
 Last in this series we looked at Riaz, lit entirely by flash against a darkish wooden wall. At left is Brett, who was lit right where he sat in a classroom chair in an unfinished commercial building with a primed drywall background.
This time around: High-axis key light with just enough strobe on the background to separate it from black. More inside.
__________
Start With the Key
I'll give you one guess as to what I used for a key light. It is really my go-to light mod for close-in speedlight portraiture now. Broken record, I know. But the not-hard / not-soft look, plus total control, in a small package is too much to resist for me.
If we come in high and in front of Brett, we create a shaft of "third-degree" -type light that you might see in an interrogation scene in a movie. The shaft is hard (-ish) and pointed straight down. Actually, it is even pointed a tad away from him and back toward me. Even so -- and even with the control you get with the SB-III -- his hair was still a little hot.
So we gobo'd the edge closest to Brett with two strips of gaffer's tape to make a quickie barn door. This gave the shaft of downlight a more defined edge. Which, in turn, created a more coming-into-a-shaft-of-light look. That's why the light gets darker as a crawls up Brett's head.
It is a crisp, 3-D look, IMO. Not nearly as out-there as what Peter Yang did earlier, but definitely on the same branch of the family tree.

Here is the setup shot, courtesy Syl Arena. The "boom" holding up the SB-800 / SB-III keylight is the flash arm off of a CSB Micro Mini. (I end up using that outfit chopped into separate parts just as often as I use it together.)
You really need some sort of boom on this -- gotta get that light right out front, and you do not want it moving. In that close, inches matter a lot.
So, our key is relatively powerful because it is in very close. Even dialed way down we will get plenty of aperture to hold focus through the face. Another bennie is that we have the ability to take that nearby white wall to black. This is all because of key-to-subject distance.
Now our white wall is totally black, which means we can make it anything with a second strobe. I chose to aim the second flash at the back wall, using a dome diffuser. This takes the flash pattern out of play and makes the tone of the wall a pure distance thing -- with a smooth gradient. If I want a fast-falling gradient, I put the light in close. If I bring the light away from the wall, the gradient gets less dramatic.
I can control the gradient's actual tone with the power setting on the flash, so the two variables can be adjusted independent of each other. I could make a barely separating grey wall by moving Brett and the light closer to the background wall, but I would lose this gradient control.
Variations on a Variation
And besides, I can do a lot with the rest of that key beam if I want. Remember, Brett is on the feathered edge of the beam, which means that we have a lot of lighting power being wasted out in the space in front of him.
I can catch that with a big reflector in low and fill those shadows if I want. Of I can put that reflector in front, just out of the frame and angled toward Brett's face for fill light very similar to that we used on Riaz. I can make the reflected light as bright or dim as I want by including or excluding the full force of the beam from the key light.
If I have Brett on the edge of the key beam, the reflected light could actually end up being brighter than where Brett is in the key. Lots of possibilities -- even maybe that pillow trick, à la John Keatley.
Long story short, the nose and chin shadows depths could be placed at any density you want. But the hard, toplight is also what gives the photo it's look. So you don't wanna rush in there willy-nilly and "fix" everything.
Just understand that you have complete choice in the tonal range of the photo -- even if you are just using two strobes and no ambient.


0 comments:
Post a Comment