 Looking through the questions that have come in so far, at least a dozen people have asked about the process of shooting manual flash without a flashmeter. So we are going to hit that one in depth today.
Like a lot of pros, I have made the switch from shooting with an incident meter to winging it and chimping off of the TFT screen on the back of the camera. Hit the jump for the how -- and the why.
The condensed version is, it comes down to working by numbers vs. working by feel. Or rather, by sight.
People who work in studios -- or photographers who want highly accurate and repeatable lighting schemes -- tend to like the comfort of f/stops displayed numerically. Measured right down to a tenth of a stop, they offer precision and repeatability.
And, truth be told, if I were going to set up 27 catalog product shots in a day I would probably let the meter do the driving. It is a different kind of shooting, and a meter is very well suited to repetitive and/or studio work.
But as someone who tends to be more of a location shooter, my first thought is always what I am going to do with the ambient. So the ambient exposure makes a much more logical starting point for me than does some magic f/stop revealed by a meter after I pop my flash.
I cannot remember the last photo I made where I did not take the ambient into account. Even if I wanted to nuke it, I needed to know where it was before I knew where to expose my photo to be safely above the ambient light level.
So, what I usually do is to make a frame on aperture priority, at an f/stop that would be a good working aperture for my final photo, in daylight white balance. This gives me two things: An ambient exposure reference point and a light color temperature reference point. For example, fluorescent lights will look appropriately green on daylight WB. I want to know exactly what ambient I have to work with.
Then I chimp my exposure and see how far, if any, I want to drop the ambient down before adding my flash.
My next step is to move to a faster shutter speed and see what that does to my photo. It's just like the Nick Turpin walk-through last week -- the ambient is not there to be an end-all "proper" exposure so much as to establish the floor to my final lit, balanced exposure. The further I drop the ambient component (before I add flash) the more range and depth my photo is going to have after I light it.
So, as I drop my ambient exposure and chimp the results, I am looking at both the histogram and the image on the back of the camera. The histogram tells me if I am crashing into full-on black anywhere.
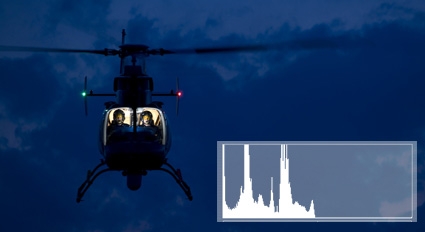
I may want to, I may not -- but the histogram tells me when it does happen by bunching a spike up on the left-hand side of the graph. In the photo above, the histogram tells me that the chopper is gonna go to a sillo, and that is fine. I am more concerned with keeping my sky in the lower half of the tonal range.
The right-hand side of the histogram tells me where my brightest highlight is. And that combination gives me the range of the ambient component of my photo.
But I am also looking at the image on the back, too. I am scoping that out to get an idea of the "feel" of the environment I am creating for my final photo. I also may shoot a frame on an incandescent balance, for example, just to see how the shifted ambient looks. Experiment. You are creating an environment for your lit photo.
Once I get my ambient tamed the way that I want it, I add the light. Chimping again, I can see how my lit subject fits in with the ambient I have laid down. Did I blow out any highlights with my added flash? The histogram will tell me -- and I would drop my flash's power or increase the flash-to-subject distance. (Or, close down my aperture and open my shutter to compensate for the ambient shift.)
In the chopper photo, I had pre-tested my flashes to look good at my shooting aperture before the helicopter lifted off. So all of my adjustments would likely come from tweaking the shutter and checking out the back of the camera. (More on that shoot here.)
Back to the process. If my highlights are okay, I am pretty much done with my histogram. In fact, in the photo above, the lit area is so small I am not even getting enough data to use the histogram to judge the lighting. I would judge it by camera screen alone.
I have chosen my ambient level, so now it is all about the image on the screen. It's just a matter of eyeballing the screen to see the relative range of tones between the lit and unlit parts of the photo.
Flash meters are all about numbers and precision. Going with the camera's display is all about feel and relative tonal values. And building your photo with the above steps is a quick and easy way to get right to the exposure balance that you want without wandering around your scene popping a Minolta meter. Just be sure to keep that histogram contained in the normal range. Unless you have decided you want it to fall off one of the edges for effect.
If you have some kind of a rigid recipe you are following, a flashmeter makes sense. But I get much more enjoyment and creativity out of "adding salt to taste," if you will. And that practice has made me a much more fluid photographer, too.
Instead of being married to f/stops and ratios, I now spend my time thinking about the feel of the photo's chosen ambient exposure level, and how I am going to shape and color my added light when I create my final look.
____________
Got a lighting question? Ask it here.


0 comments:
Post a Comment