 Way back when, we talked about the idea that you could balance your flash and ambient light levels by leaving the shutter open long enough for the ambient light to burn in.
But during that "burning in" time, there are also lots of things you can do to add layers of interest to your photos. And that is exactly what we will be covering in the last unit of Lighting 102...
The beauty of altering your camera's settings, focus, focal length or position during a flash/ambient exposure is that you can merge two completely different sets of circumstances into one single frame. It's a little like in-camera Photoshop -- with a nice, creative randomness attached to it.
Today, I want to go through a few of the ways in which you can manipulate your photo during burn-in and show some examples of the end results.
Flash and Pan
 For this shot of a soldier in the woods near Ft. Meade in Maryland I based my exposure on the ambient light level. The first value chosen was the shutter speed, which was chosen to create the best pan effect.
 Having chosen the shutter, that also gave us the aperture for the proper exposure. Then, it is just a matter of adjusting the flash to the correct power to light Robert's face.
So, why even use flash at all?
First of all, because the flash adds a nice margin of error to a pan shot. Since the flash happens instantaneously, it will freeze your subject. This works best if the background is brighter than your subject. If you expose for the background, your subject will be dark -- and ready to be frozen by the flash without any ghosting.
Second, it gives you control over the relative exposure level between the subject and background. I could have raised or lowered the background level, for instance, without changing the tonal values on Robert's face.
(More on how this photo was made here.)
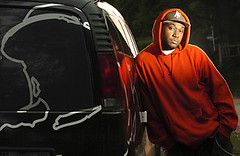 For this shot of an up-and-coming local hip hop artist, I spent a few frames grabbing a flash/pan look even though he was not moving during the exposure. It was an assignment that appeared to be doomed form the start, so I was grasping at straws.
(Perversely, I kinda enjoy the challenge of situations like that. As long as they do not happen all of the time.)
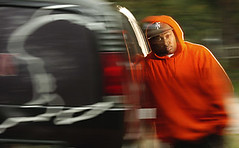 The top frame is a static shot, and this is the panned version. The rapper (who performs as "Bossman") had just been signed by a record label and his ego was in overdrive.
 I am sure he thought he deserved to be surrounded, nonstop, by a dozen of those dancing hotties from MTV and BET. And as such, was far too cool to waste his time on a lead photo in the Features section in the local metro daily. So (once I pried him out of his living room) anything I wanted to try for variety had to be done without changing the setup.
But even when pinched for time I am always looking to burn a few seconds trying something different just to see what it looks like. And even if this one did not work out very well (we went with the still version) the point is that a quick change of the shutter speed and moving the camera could give me a second look -- without wasting any more of His Majesty's precious time.
(You can read more about this blood-from-a-turnip shoot here.)
Will it Go 'Round in Circles
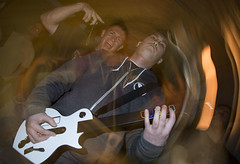 Another way to add an abstract layer is to rotate the camera during a flash exposure. When I am shooting with just a point-and-shoot and built-in flash, this is sometimes the only way I have to amp a flash-lit photo.
In this shot of Danny Ngan owning Chase Jarvis on Guitar Hero, rotating the camera during a flash exposure helped to make the background a little more abstract.
________
Whether you are panning, or panning or rotating, you want to begin the action before you press the shutter. This will give you a smooth effect, without the jerkiness that happens if you wait until you start the exposure to start the movement.
As before, it also helps if you are working against a brighter background.
Diffuse the Situation
 Using time as a variable during a flash exposure does not necessarily mean moving the camera, either. You can shoot one portion straight and the other portion heavily diffused, for instance. Or filtered. Or both.
In the "Winter Book Club" assignment show at left, I started the exposure by firing blue-gelled flash from the back while there were about eight layers of plastic wrap over my lens. Then I removed the diffusion and finished the exposure painting with the modeling light on a second SB-800 with a CTO gel attached.
All of this has to be done in a darkened room, of course, or you will get (unwanted) burn-in from the ambient light. You can see more detailed look at how this photo was made here.
By now, you should be starting to get other ideas on how you can use time to manipulate your images while they are still being formed. You might, for instance, choose to light someone against a sunset and the defocus the camera during the ambient portion of the exposure. If you need for the image to stay in register during the process, a tripod is obviously a big help.
NEXT: L102 7.1 - Flash Zoom and Stone Soup


0 comments:
Post a Comment