 Leading off is the audience
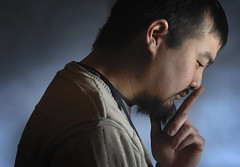
 Having blinded this poor guy 30 minutes earlier with a full-power flash to the eyes at point-blank range, (long story, and I was not technically the trigger man) I thought I'd pile on a little bit by putting him on the spot to model in front of the rest of the class.
We created the scenario of our having to quickly shoot some tech guru between sessions at a hotel conference, thus explaining our conference room as the environment. The fictional assignment would be to shoot him for a biz tab cover story on his bringing a new, high-tech venture to the Providence area.
So we needed something simple (but a little graphic) that looked more ethereal and less "hotel conference room." Having just brainstormed the room, we gave this shot the additional restriction of our having to use only found objects in the room as light modifiers.
For a soft, directional light source, we tipped a table (with a white tablecloth) up on its end and bounced a speedlight off of it. Granted, this was kind of a "stone soup" approach to lighting. But the point was to be able to go with whatcha got. We were just stretching the idea to prove a point.
The background light is just a bare flash, with a tungsten-to-daylight conversion gel, shot through some of the hotel's water glasses.
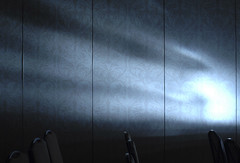 This wide, in-focus shot shows the "bent light" pattern created by the harsh flash through the glasses. In the final photo, the wall was significantly out of focus. This transformed the light pattern into a more subtle abstraction.
Again, we were pretty much creating this on the fly over the period of about ten minutes at the end of the session. It is always interesting to me to see the way these seminars morph into an organic exchange of ideas. Several of the attendees saw possibilities in the room which I would have missed.
You learn something new every day.
For the next day's (shorter) session, I decided to spend less time talking about the stuff that people could find on the website. So after about 45 minutes of dissecting the lighting on a series of photos, we bailed out into the hall to make a few photos of our own.
Oddly, the pace we kept on the three situations out in the hall was pretty close to how I would have worked on a typical assignment, with the small exception of the 80 people looking over my shoulder as I shot. It was like being in one of those Verizon commercials where the whole network follows the guy with the geeky glasses.
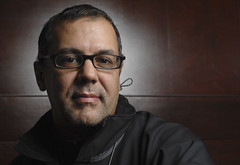 Here is one of the three situations we did out in the hallway, before heading back to the room to show the process shots up on the big screen.
The lighting for this shot really couldn't be simpler, as we got double duty out of a white satin umbrella and an SB-26 flash. The background was a darkish wood panel, with a semi-gloss finish. Those surface qualities lend themselves to the two-for-one effect we got from the soft light.
In front, the subject is obviously being lit by an umbrella over my right shoulder. But the wood panel is throwing back two distinctly different tones. At the edges, you see the true tonality of the wood (a little dark, actually, as it is further away from the light than is the subject.)
The hot spot in the background is an intentionally placed reflection from the the umbrella. The finish of the wood softens it up enough to make it a little abstract. Since we are not using modeling lights, it was just a matter of chimping the camera to make sure the reflection was in the right place to separate the shadow side of the face.
This is a super-easy, one-light technique that you can get from any dark, moderately reflective surface. It's a good trick to keep in your back pocket to make one light look like two lights.
As usual, click on any of the photos to see bigger versions.
Thanks much to everyone who attended the NSC, and especially to the student volunteers who made the trains run on time. It was a great weekend in which I got to see many old friends and make many new ones.


0 comments:
Post a Comment