On an instinctual level, we subconsciously classify each person we come into contact with into one of four categories. We either want to kick their butt, flee from them, nurture them or, uh, grab a cheap hotel room with them.
It is in that frame of mind that I have come to learn how I react to pictures as a photographer. Specifically, I am talking about how I react to them with respect to lighting.
The first category would be photos that simply do not interest me enough on a technical or emotional level to care about them.
The second would be photos that I immediately stop and try to reverse engineer. You cannot hide light. Light is physics. And if the light is interesting enough to me, I will come up with at least a rough approximation as to how it was done.
These latter photos fall into one of two subcategories.
First there are the ones that just leave me in awe after I figure out how they were done. After all, it is one thing to be able to reverse engineer a photo after the fact. And yet another to come up with the idea in the first place during the process of creating it.
It's the difference between Keith Richards creating the simple-yet-perfect guitar riff for "I Can't Get No Satisfaction," and some 9th grade hack aping it and thinking he is the New Keith Richards.
But then there is the other category, into which most well-lit photos fall for me. I can see how they were done. But I immediately try to think of a way in which they could have stretched them a little bit.
This is not perfectionism. Perfectionism is a vice from which I have proven myself quite immune. Just ask Missus Strobist. She'll back me on this one.
Rather it is a mental ethic that is a gateway to what I always hope to nurture as a shooting ethic: The idea that the first 95% of the effort just gets you to "good."
And the next 5% can get you to something better.
When I am working on a portrait or a studio shot, the last thing I try to think before I quit with something perfectly acceptable in the can is, "What can I do to amp this photo before I tear down?"
After all, you really have nothing to lose - and everything to gain - with this approach. No one is gonna take your already-shot good photo away because you fail at the stretch attempt.
Worse case, you make an interesting failure. Which in itself has much value to the learning process.
It is in that spirit that I am beginning this series. It is nothing more than a thinking-out-loud version of what I do when I cruise through the Strobist Flickr Pool every day. Or drive past a billboard. Or thumb through a magazine.
Like my favorite T-shirt, which simply says, "Quietly Judging You." (Only, not in a bad way.)
As I throw up PML photos over the next few weeks, the thing to keep in mind is that they were interesting enough to merit the effort to brainstorm how I would have tried to improve them, had I shot them.
They are already at 95%, and this is just a mental exercise to find something - not the only thing, but something - that could have sent them to the next level.
These will be pretty straightforward for the most part. I am not gonna launch into some exhaustive critique so much as throw a stream-of-consciousness idea or two out there to hopefully spark the way that you think about good photos when you see them.
Don't let the good photos you see be an end-all. Let them be a jumping-off point.
_____________________________________________________
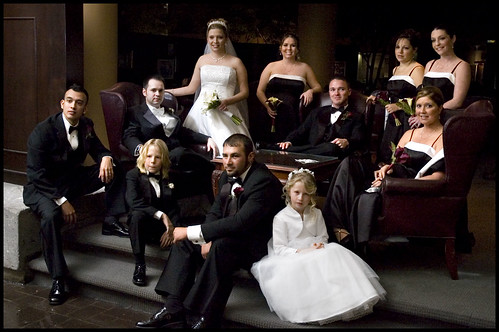 The first photo, from GoHiking26, is a very good example of a group shot at a wedding. The photographer is using two speedlights, working quickly via the Nikon CLS remote lighting system.
They have one light on camera, bouncing off of the ceiling. There's a second light bouncing off of the ceiling off to the left. This is great frontal/side light, not to mention that whole Godfather-family-portrait posing thing they have going on.
But let's stop for a minute and think about the gear that is being used. There are two light sources to play with, and at least one stand. We also have a way to wirelessly trigger at least one of the lights.
We know that the photographer is probably traveling light and working pretty quickly, so let's keep that restriction, too. So what can we do with one light on camera and one off-camera stand light with this group shot?
The thing that immediately came to mind when I saw it was to use the stand light as a backlight. Only question is which way the backlight would be firing - at the background or back toward the camera?
Actually, there is another consideration: Whether to leave the backlight as daylight balanced or play with the color a bit. I'd probably warm it up to tungsten.
First, I know I am gonna have that gel, as it is one of the basic two gels I always have connected to my flashes. Second, it is going to add some color to the monochromatic theme of the photo. Third, tungsten is a color that we'd just take for granted as being from a normal, continuous light source.
Why the backlight at all? In a word, separation.
I'm not talking about nuking these guys. I am talking about adding another layer of light - with some warmth - to separate them from the background and provide another layer of depth to the photo. I'd just stick it off camera at back camera right and let it do it's thing.
The beauty of this approach is also the margin for error allowed on the lighting level from the backlight. Balanced with the exposure would look fine. One stop under: Fine. Two under: Subtle, but fine. One stop over: Fine.
You also have a couple of choices on the direction. You could skim it across to light the background from back camera right. The fact that the light would be coming from so far off of the camera's axis would texture the background nicely.
But you could also aim it back at the group, providing hair/shoulder separation lights for everyone. Might want to short snoot it to control any glare. Pointed in either direction, you would not need a lot of light, either.
Look at the photo and imagine either a muted warm glow on the areas in back or a muted splash of tungsten color on the back right side, which currently merges into the shadows. That'd be killer - especially the three ladies on the right.
My first choice would for that second effect - aimed back at the group from back camera right. I'd set the light to hit about one to two stops down. Less is more in this instance. Don't nuke - just separate. On second thought, I'd probably try to do both.
Snap, snap, snap.
"Just a minute, folks." (Walk back and quickly re-aim the separation light to point back into the background. Up the power by a stop.) Totally different look.
But wait, you say. We need the stand light for the front light.
Sure - we need a front light, but it does not have to be the stand light. Okay, best case, I want the front light coming from camera left just like in the current photo. But remember, they are also bouncing a flash from on camera, which could be the new front light. It is amazing how three-dimensional a bounced flash looks when accented by a raking backlight.
If I have two stands and the ability to trigger both flashes off-cam, I'll take the umbrella at front camera left and the back/separation light at back camera right. But if I only have one off-camera light, I am gonna bounce (on-cam) the main light and back/right stand the second light.
In fact, if I only have one light and I am gonna use it off-camera, I am just as likely to use it as a back/sidelight to help pop the ambient and add some three-dimensionality/separation as not.
The important thing to remember in this instance is that it would be just as quick to set up the second light as a separation light as it was to use it as a second front/side light. And again, this is a perfectly fine photo. And on a given day you could very well choose the employed technique over what I might like to do.
But that is what ran through my mind in the first 30 seconds I spent looking at this photo.


0 comments:
Post a Comment