 As part of a long-term project I am working on with a local school, I popped into the gym after school recently to shoot archery practice. And it brought to mind a quickie tip for lighting big spaces.
A gym is a big-volume place, full of ugly light. You can't hope to light the whole thing very effectively with a few speedlights. But you can light selective planes and create the illusion that large, 3-D areas are lit -- even if you can only place lights at the periphery, lest your lights get skewered.
__________
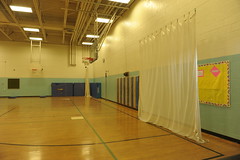 Always start with a first look at the ambient. That's what I always do when assessing an area to light. A quick shot on auto exposure and daylight balance lets me know how much ambient there is, and what color it is.
Answer: Not much, and puke green. Perfect.
The auto-ambient is 1/15th of a sec at f/5 at 200 ISO -- pretty dark. And honestly, the darker a big room is (within reason) the better as far as I am concerned. With big areas, I want to give myself a friendly aperture to be able to hit with strobe when I build it back up.
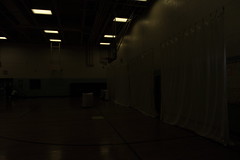 Step two, is to knock out that ambient while leaving myself as much ability to light as possible. So, go to my sync speed (1/250th) and close down the aperture just until the bad things go away. 1/250th at f/6.3 is plenty dark. In fact, I probably still have a stop or so of leeway, in case I need to adjust my strobes' exposure by remote control by just tweaking my aperture setting later.
Just enough, but not too much on your new, ambient-killing exposure. I could easily nuke ambient with f/16 at 1/250th, but then I would have to light it to that level. Not an easy thing to do with speedlights at distance. Make life as easy on yourself as possible.
__________
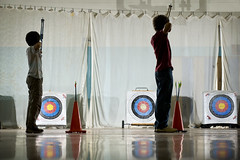
The trick to working with speedlights in a volume this big is to realize that you do not have to light that whole volume. Just light the planes you are going to shoot -- be they walls, targets, people or whatever.
 Case in point: Strobes #1 and #2 are lighting my shooters. Not much -- just enough to give them a little wrap detail and keep them from being a sillo. And you could easily light this whole thing with just two flashes if you were cool with the shooters going black. That's a pick 'em, or an easy out of you did not have enough flashes.
The two lights nearer to the camera (#3 and #4) are lighting the targets. I aimed the left flash at the right target area and vice versa, for even coverage.
Setting my flashes on 1/4 power at a 105mm throw, I can easily light up the targets at a significant distance. Ditto for my archers.
Another consideration here is that my lights are lighting both shooters and targets without being in the line of fire. I thought about placing them between the shooting alleys near the arrows' flight paths. Then I watched some of the shooters warm up. Ummm… No.
(They aren't making SB-800s anymore.)
And not that this light is anything major special, either. But remember the sickly pea soup we were in a few minutes ago -- it is that difference that is important to me.
 Once we have lit the two planes, I can use the same setup to grab a detail shot, too. And it looks completely different with a longer lens -- almost as if that (now visually compressed) space is not even there.
 If I want to adjust the exposure (liking this one a little more saturated) that's an easy fix by varying the aperture. No need to adjust the actual lights, as the whole thing is built on flash.
Your aperture is now your volume control.
__________
Same Principle, Different Approach
 This project is activity-driven as far as subject matter goes. But the important part to me is producing a series of portraits of middle schoolers who are mastering their environment. The project will ultimately be aimed at incoming 6th graders, who are looking at middle school with mixture of garden-variety fear, and total, unadulterated fear.
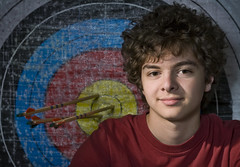
 So after the practice, I grabbed a portrait of the best archer in the group. And just like the above photos, this one is built with lighting on planes -- albeit in a different sense.
Their gear is pretty spartan, with nylon reusable targets and arrows of rather dubious fletching. We used three of the better arrows, and posed our archer against the target. There were only a couple of minutes to shoot, as class was ending and he had to go.
The target is much lighter in tone (especially at the edges) than is the archer, and I wanted to switch that relationship around, to place emphasis on him.
In the same way we can light planes, we can choose to exclude them -- even if they are practically adjacent. The target is lit by an on-axis (or nearly so) umbrella placed behind the camera. By lighting him to two stops down, we provide fill on his face and take the target down to saturate the faded colors while taming the white edges.
Two birds killed with one stone, we light the face next.
 As you can see above, even though his face is right next to the target, we can light both planes separately by using a grid on his face and feathering it away from the target.
The important thing to remember is not to aim it at his face, but rather in front of his face. Just skim him to the front, and you can use the edge of the gridded beam to light his face without hitting the target.
(You could also gobo off the light to get this effect, with slightly different results. But I like the way the edge of the beam looks on a face.)
So, we are lighting a face on a completely different plane that is the lighting on the target which is just a few inches away. This means we can gel the face but not the target, which is exactly what is done here. A 1/4 CTO warmed up the flesh tones just a tad, without coloring the background at all.
Plane and Simple
By thinking of your lighting zones as planes, you can bypass large amounts of unneeded dead space. Or you can also be picky about just where your light goes and where it doesn't.
And the efficiency of lighting on planes helps you to easily overcome yucky ambient in large, dark spaces.
__________
Next: Prep Quarterback


0 comments:
Post a Comment