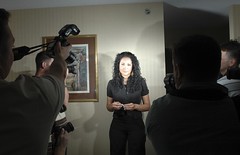
 This photo, which was previously posted on Monday and shot during the DINFOS Advanced Lighting Team workshop last Friday, got a lot of interest up on the Flickr comment threads. So I thought I would do a little tutorial on exactly how it was done.
If you are looking for a setup shot, you already have it. The photo is the setup shot. We used everyone's flash, synchronized to produce a photo that looks random but was in fact very choreographed.
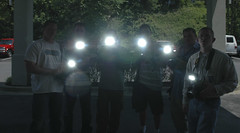
We used six flashes for the shot - 3 SB-26's and 3-SB-800s. They were mounted on voice-activate light stands, also known as photographers. There are several tricks to pulling this off. But once you have a roadmap, it is quite easy.
First, you have to make the flashes think they are not connected to the cameras. We did that by sliding pieces of paper between the flash and the hot shoe. (After that point the shooters are essentially light stands.)
Second, you have to sync the flashes together and to the main shooter's camera. We did that by using Pocket Wizards on the SB-800's and using those in turn to fire the SB-26's in slave mode. You could do it with fewer flashes -- even one could look cool. But we had six at our disposal. So what the heck, baby.
Third, you have to position the flashes to create the light you want. It appears fairly random. But if you look carefully, we have two back lights, two side lights, a front camera left main light (coming from up high - the "Hail Mary" camera, for a good lighting angle) and a front camera right fill. Kinda hard to miss, come to think of it.
My camera, ironically, had no flash on it -- only a Pocket Wizard. IMO, the total effect almost looks a little Jill Greenberg-ish, but without the soft lights or ring flash.
The exposure was based on the sky. I wanted to underexpose it a couple of stops. So we shot with a D70s (using the electronic shutter sync hack) at 1/1500th at f/8 at ASA 200, if I remember correctly.
The flashes, in close and zoomed to 85mm, were set on 1/8 or 1/16th, depending on their distance to the subject. So recycle time was not an issue. I could have pretty much motored away.
Always remember: Short distance = power and speed.
 I had never tried this technique before, and our only prep was a couple of shots up in the hotel room. We like to be thorough, so we put in a good minute or so of research and testing.
 Really, this was just a run-and-gun thing, with very little prep time and not much shooting time, either. It was shot at 1:00pm on a 96-degree day in really crappy light. We had much to do, and we were getting hungry.
 Once we were downstairs in the parking lot, I popped a couple of frames to make sure that all of the lights would synch. They did -- every time. No worries, mate.
Also, I wanted to make sure that the flashes would all sync at the high shutter speed. As you can see, we were batting 1.000, even though we were working way above the ambient light.
I have to say that I absolutely love this new (for me) technique. And I would probably use the crap out of it, given the opportunity. But since I do not have six shooters following me around every day, it won't end up happening very often.
That said, I will probably be experimenting with overpowering daylight with a bunch of hard lights wrapped around the subject more often, too.
Here is what struck me from the process.
• It was far easier to choreograph (and pull off on a technical basis) than I expected. If you try it, be sure to stick your results up in the Flickr pool.
• In the end, it was darn-near impossible to get a bad looking shot. They were almost all keepers. Which actually sucked at 2:00am when we were editing this stuff. It was not easy to narrow the pix down.
But as problems go, I'll take that one every time.
As you read this, the missus and I will be at Walt Disney World with a 6- and an 8-year-old in tow.
Lord, give us strength. And please send that 3:00pm thunderstorm to thin out the amateurs in the crowd.


0 comments:
Post a Comment