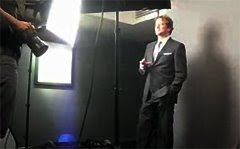
 UK Photographer Greg Funnell shot actor Colin Firth for Time Out London, and knew he would only get a few minutes. Thus the "PDQ."
He wanted a lighting scheme that was safe over a range of subject orientation. Thus, the "CYA."
Hit the jump for a video, links and an alternate way to think about the light that can allow you to have your CYA-PDQ cake and eat it, too.
Greg was working in a hotel basement (ahh, the glamorous life of a photographer) and lighting with a pair of Elinchrom D-Light 2s in soft boxes. His solution was to run the boxes at 45-degree angles from each side of the subject. The idea was to get light that wraps and worked for either direction Firth might have been looking.
At this point, I should note that I am typing very quietly because the mere mention of Colin Firth in my household sends my wife into a dizzying tailspin of knee-buckling ecstasy. Something about a "pond scene" from Pride and Prejudice.
Me, I just don't see it. But my strategy during a Colin Firth Movie is always to focus on preserving that momentum, while being very careful not to do or say anything that might actually invite comparison between me and Mr. Wonderful.
I digress.
There is certainly nothing wrong with lighting Mr. Firth on the 45's. But if you are working with two soft boxes you can keep your safety while adding some directionality to the light.
The key is to recognize that the part of the photo that makes it sing is also your danger zone if you are trying to play it safe. That part would be the shadow area, obviously. So the idea is to balance the shadows so that they are there, but also legible if something interesting happens inside them.
You Knew This was Coming...
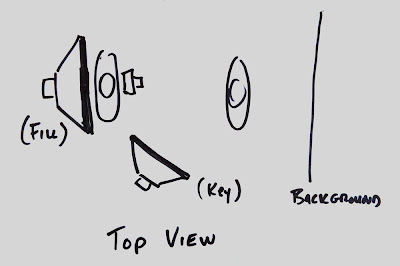
This is where off-axis key vs. on-axis fill can let you have it both ways. Let's work this one using Greg's exact gear used for the shoot: Two medium soft boxes and monobloc flashes.
Start out with one of your two soft boxes in the vertical orientation. Place it 45 degrees, give or take, to one side, and elevate it a little for good shape and form on the face. This, of course would happen before Mr. Why-Can't-You-Be-More -Like-Him arrives. You would test on the assistant or anyone else who happened to be standing around.
Remember to use whatever means necessary to get your stand-in to the right height, too. This is something you already know because you (a) Googled it, (b) asked an assistant, etc. Also find out of your subject will be wearing glasses, as that dictates lighting style to some degree.

Your fill light will come from directly behind the photographer's head, with the box in the horizontal orientation. This light is not so much going to shape the face as to fill and wrap the light. I would elevate it just a little, because your shoulders are gonna knock some of the bottom out, anyway. Maybe place the bottom horizontal edge of the box even with your shoulders.
Given that the D-Lite 2's have a built-in slave eye in the rear, I would radio (or PC cord) sync the fill unit behind me and slave the key light.
For ratios, start out testing the light with only the fill light firing. Adjust the light and/or aperture until your test subject has a good exposure. Now, back off the fill light (either by cranking the aperture down or dialing down the power of the light) until your subject is underexposed but still holds legible detail. This is the darkest your shadows will get in the final photo. And there will be no shadows you cannot see into, because your fill is coming from on axis.
Now, the balance is between safety and tonal depth. There is no set rule, other than how much of a weenie you happen to be on any given day.
Ten years ago, I would have set the ratio pretty tight. Stop-and-a-half, maybe. Because at that point I was all about the fear of failure. But now, I'd let it drop past two stops -- heading toward three, actually. Chuck Norris might take it down even further.
After you have completed this little exercise in self-examination, bring in your key light and dial it up so the subject looks great at your working aperture. For the shutter speed, you'll want to keep that up at max sync speed to nuke the ambient. Maybe warm up that key a tad with a 1/8 CTO.
Oh, wait, he is British -- better make it a 1/4 CTO.
As for direction of the key, you might want to work your angle so the subject's shadow falls far enough away on the background so you get some light on the background in the area directly behind the shadow side of your subject. You can vary this by either changing the key light location or moving the background further away from the subject.
There are side effects to consider. Changing the key location will alter the quality of light on the subject. Moving the background will alter the tonality of the background. Use the choice that works best for you. A combination of the two moves might work even better.
So now, when Mr. OhmyGodHeIsRightHereInFrontOfMe shows up, you know exactly how your ratios are going to look, no meter needed, and you are ready to roll from Frame One. Plus, you'll get shape and details no matter which way he looks.
And if you need an assistant, Missus Strobist is available -- at absolutely no charge whatsoever.
(Thanks to Greg for making and posting the video of the shoot!)
RELATED:
:: Greg Funnell: Website ::
:: Greg Funnell Blog Post (Includes Time Out Tearsheet) ::
:: Video: That Pride and Prejudice Pond Scene ::


0 comments:
Post a Comment